Have you tried lotion bars yet? Your skin will thank you!
Unlike bottled lotion from the store, (which end up in landfills after you empty them), homemade lotion bars don’t use bottles and don’t contain icky ingredients you can’t even pronounce like: Aluminum Starch Octenylsuccinate (linked to reproductive toxicity), Ceteareth-20 (alters the skin’s structure to allow other ingredients to absorb, considered a moderate to severe health hazard), DMDM Hydantoin (a formaldehyde releaser to prevent mold from growing), Allantoin (can produce rash, stinging, itching), Methylparaben (can lead to UV-induced damage of skin cells), Carbomer (toxicity when applied to the skin is unknown), and various alcohols which are going to do nothing but dry your skin.
The most interesting thing I found is EVERY SINGLE BOTTLE of commercial lotion, no matter who makes it or how expensive it is, contains WARNING labels that say something to the effect of “For External Use Only,” “Keep Away From Children,” “Contact Poison Control if Swallowed.” Yikes! All those dangers, but I’m rubbing it all over my skin like nobody’s business, and it’s absorbing into my pores, and then what? And then I’m petting my dog, snuggling my kids, rubbing my eyes or my lips. There has to be a better way to have soft skin!
THERE IS!
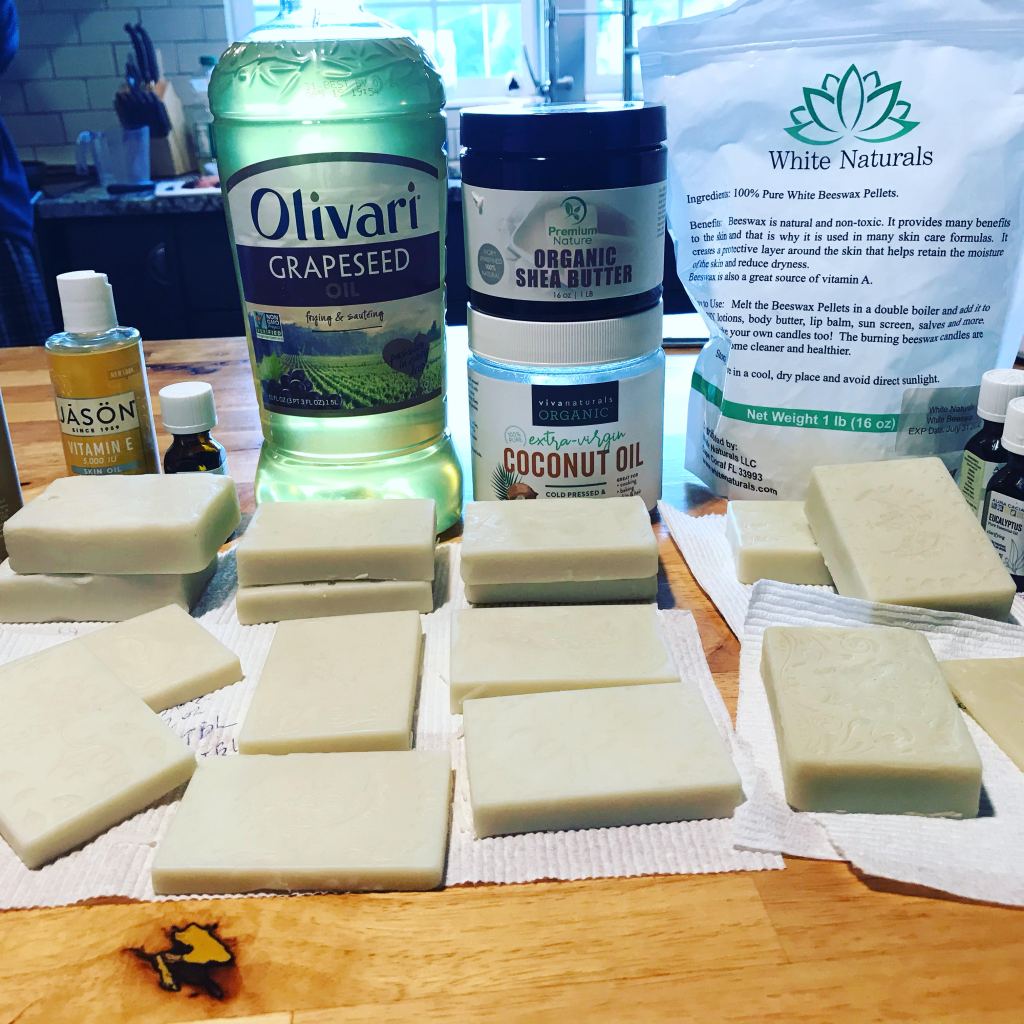
None of us want toxicity in lotion, so let’s look at the ingredients of Homemade Lotion Bars. There are THREE! Yes, three ingredients: Butter, Oil, Wax. That’s it. Commonly used are Shea Butter, Coconut Oil, and Bees Wax.
Shea Butter: anti-inflammatory, smooths and softens your skin, decreases age spots, prevents and reduces stretch marks, hydrates your skin. Contradictions: Shea butter is from the shea nut, so if you have a nut allergy, shea butter can cause itching, rash, skin reaction. If you are a nut allergy person, you can substitute Cocoa Butter which smells like chocolate or Mango Butter which has no smell at all.
Coconut Oil: Softens skin, re-hydrates, anti-inflammatory, has microbial properties that helps fight acne and even eczema. Contradictions: In topical usage, there are no contradictions unless you’re allergic. If you are a coconut oil allergy person, you can substitute Grapeseed Oil, Jojoba Oil, or even Olive Oil.
Bees Wax: anti-inflammatory, encourage the healing of wounds, won’t clog pores, high in Vitamin A which supports cell reconstruction. Contradictions: Again, there are no contradictions unless you have an allergy.
THAT’S IT! Those are all the ingredients. The best part is if your toddler sticks the bar in his or her mouth, you won’t be on the phone with poison control.
So, what’s the recipe?
Well, that’s the Hit or Miss part of this blog. I’ve mixed those ingredients many different ways and haven’t been happy with some of the results. One batch was too sticky, one too oily, one too dry, one not dry enough. You want a nice glide between the bar and your skin, but no oily residue, and certainly no sticky, tacky feel.
There are many lotion bar recipes online, but very few tell you if they’re measuring fluid ounces or dry ounces. Fluid is volume. Dry is weight. Those are two completely different things when it comes to butter, oil, and wax. Two ounces of oil in a measuring cup is a whole lot different than two ounces on the scale.
The first batch I attempted was equal amounts of each by fluid ounce. It turned out too oily and melted at room temperature. Why? Take your seats boys and girls. Science class is about to begin. And this will be on the test so pay attention.
Bees wax melts at 62-65 degrees Fahrenheit, so it will become soft in your hands because you are 98.something degrees. Shea butter melts at 104-113 degrees. So, logic dictates if my bars were melting at a room temperature of 70ish, I probably needed A) more wax, B) more oil, or C) more butter?
The answer is C. I definitely needed more Shea butter in the recipe to keep it solid. We’ll keep that in mind for later, but first let’s try a different measurement.
Batch 2 was equal amounts by weight. It had a better consistency, but oil by weight is a lot of oil! It left the bars too oily feeling. I liked the firmness of these bars, so this might be a good mix if I cut back on the oil.
Batch 3. I cut the oil way back to one tablespoon. Yes, the bars were less oily, but now they were too sticky/tacky. There are differing opinions on tacky. Some say it’s too much butter, some say not enough butter, so…since science (above) says the butter doesn’t melt until a higher temp, logic indicates tacky is probably not caused by too much butter but not enough, so…
Batch 4 by weight was 2 parts wax, 3 parts butter, 1 part oil (yes, I increased the oil). This was much, much better, not tacky at all but still a little oily for my taste. I read coconut oil is one of the oiliest oils you can use, so Batch 5, instead of coconut oil, I tried the same recipe with grapeseed oil which is a little lighter, less greasy, and …. … drum roll, please … … no difference. Sigh.
I walked away, frustrated.
But, the next day, I discovered after I let them sit out overnight and completely dry, both Batch 4 and Batch 5 were perfect. So, for now, that’s my magic recipe for pretty decent lotion bars. By weight: 2 oz wax, 3 oz butter, and 1 oz oil. This will make about two full soap-size bars.
Now… if you’d like some extra Vitamin E or some sweet-smelling scents in your lotion bars, you can change out some of the oil for Vitamin E oil and/or your favorite Essential oil. I tried various amounts of different oils with differing results – again too oily, too smelly, not smelly enough. I finally liked trading out a small part of the coconut oil with a 1/4 tsp Vitamin E and 1/4 tsp Essential oil (about 10 drops). Yes, that’s fluid measurements. I know. What are you going to do? Sigh. So, that’s where I’m at – still searching for the perfect scent mix. 4 drops of this, 5 drops of that, a smidgen of the other, and abracadabra…All I know for sure is by the time I perfect my recipe, I’ll have the softest hands in Tennessee!
If you’d like to try making some for yourself, use a double boiler to melt the butter and wax together. If you don’t have a double boiler, put about an inch of water in a sauce pan and place a metal bowl or a smaller pan on top. You want to heat the butter and wax together without getting any water in it. I use a sauce pan with my steamer basket sitting on top and my ingredients in a mason jar on top of that. It’s not pretty, but it works. Once your butter and wax have completely melted, remove from heat and stir in oils. Use oven mitts, as bowl/pan/jar will be hot, and pour melted mixture into soap molds or even a muffin pan. They take about 4-6 hours to dry completely on the counter, only 15 minutes in the fridge or freezer. Once mixture is poured, immediately wipe the bowl/pan/jar out with a paper towel or an old cloth to throw away. Don’t wash that wax down your sink! After you’ve wiped all the melted wax out of the bowl/pan/jar, wash it in hot soapy water.
Here’s to soft skin!!
